Voici la liste des commandes réalisées, à l'Université de Montpellier, pour installer Pod v2, serveur par serveur.
Architecture des serveurs
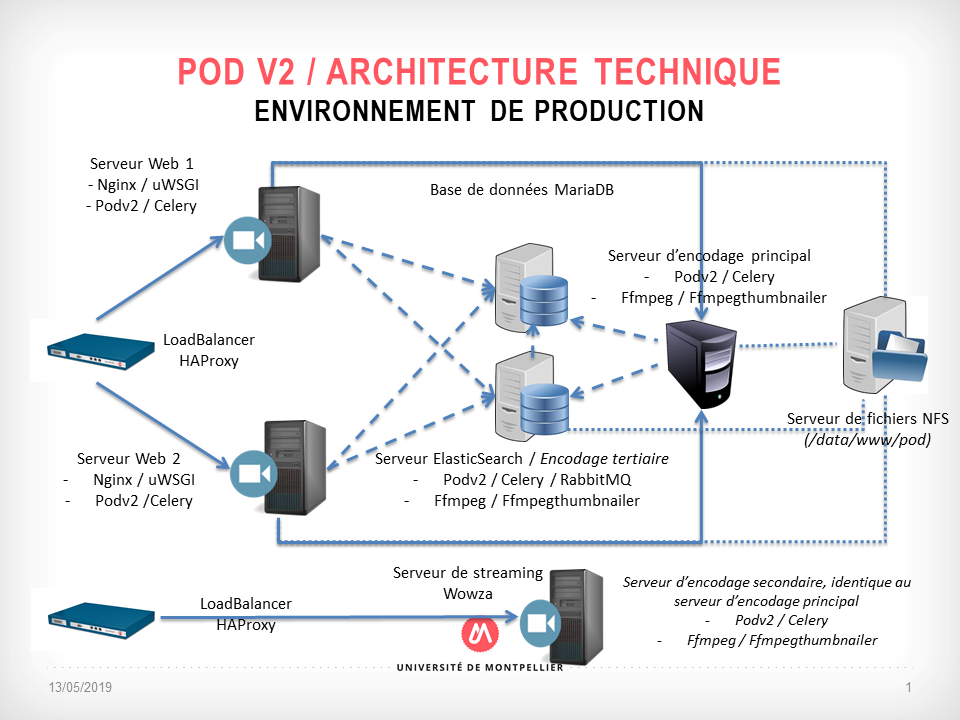
Serveur Elasticsearch / Serveur d'encodage tertiaire
Il s'agit du serveur principal pour Pod v2; il sert pour Elasticsearch, RabbitMQ et sert également d'encodage tertiaire.
Prérequis
| Compte | Répertoire (si besoin) | Commande | Commentaires |
|---|---|---|---|
| root | yum install emacs | Installation de l'éditeur emacs | |
| root | yum install epel-release | ||
| root | yum install mariadb-devel | Installation du client MySQL/MariaDB |
A ne réaliser qu’une seule fois, pour Pod :
| Compte | Répertoire (si besoin) | Commande | Commentaires |
|---|---|---|---|
| root | mkdir /data/www/pod/media | Création du répertoire media | |
| root | chown pod:nginx /data/www/pod/media -R | Utilisateurs du répertoire media | |
| root | chmod 755 /data/www/pod/media/ -R | Droits du répertoire media |
Installation de Podv2
| Compte | Répertoire (si besoin) | Commande | Commentaires |
|---|---|---|---|
| root | yum install -y https://centos7.iuscommunity.org/ius-release.rpm | Installation : ius-release.noarch 0:1.0-15.ius.centos7 | |
| root | yum update | Mises à jour | |
| root | yum install -y python36u python36u-libs python36u-devel python36u-pip | Installation python 3.6 | |
| root | python3.6 -V | Vérification de la version de Python | |
| root | python3.6 -m ensurepip | ||
| root | python3.6 -m pip -V | Vérification de la version de pip | |
| root | python3.6 -m pip install --upgrade pip | Pour mettre à jour pip3 et utiliser directement pip3 | |
| root | pip3 install requests | Installation du package requests | |
| root | pip3 install request | Installation du package request (utile pour la reprise de l'existant) | |
| root | pip3 install wget | Installation du package wget (utile pour la reprise de l'existant) | |
| root | pip3 -V | Pour vérifier la version | |
| root | /data/www/pod/ | pip3 install virtualenvwrapper | Installation environnement virtuel |
| pod | /home/pod/ | emacs .bashrc | Configuration pour l'environnement virtuel de Pod v2 et l'utilisation d'emacs pour sudo ########## POD v2 ########## export EDITOR=`which emacs` export SUDO_EDITOR='/usr/bin/emacs' export WORKON_HOME=/data/www/pod/.virtualenvs export VIRTUALENVWRAPPER_PYTHON=/usr/bin/python3.6 source /usr/bin/virtualenvwrapper.sh ########## POD v2 ########## |
| pod | /home/pod/ | source .bashrc | Prise en compte des modifications |
| pod | /data/www/pod/ | mkvirtualenv --system-site-packages --python=/usr/bin/python3.6 django_pod | Création environnement virtuel |
| root | mkdir /data/www/pod/django_projects | Création répertoire | |
| root | chown pod:nginx /data/www/pod/django_projects/ | Appartenance du répertoire | |
| pod | /home/pod/ | ln -s /data/www/pod/django_projects django_projects | Création lien symbolique dans le home directory |
| pod | /data/www/pod/django_projects | git clone https://github.com/esupportail/podv2.git | Récupération des sources |
| pod | /data/www/pod/django_projects/podv2 | workon django_pod | Choix de l'environnement |
| pod | /data/www/pod/django_projects/podv2 | pip3 install --upgrade pip | Mise à jour pip |
| pod | /data/www/pod/django_projects/podv2 | pip3 install -r requirements.txt | Installation de toutes les librairies python |
| pod | mkdir /data/www/pod/django_projects/podv2/pod/static |
Installation de ImageMagick
Utilisé pour la génération des overviews.
| Compte | Répertoire (si besoin) | Commande | Commentaires |
|---|---|---|---|
| root | yum install ImageMagick ImageMagick-devel |
Installation de ffmpeg
Utilisé pour l'encodage des vidéos.
| Compte | Répertoire (si besoin) | Commande | Commentaires |
|---|---|---|---|
| root | /opt | mkdir ffmpeg | Répertoire ffmpeg |
| root | /opt/ffmpeg | wget https://johnvansickle.com/ffmpeg/releases/ffmpeg-release-amd64-static.tar.xz | Téléchargement |
| root | /opt/ffmpeg | tar -Jxvf ffmpeg-release-amd64-static.tar.xz | Dézip |
| root | /opt/ffmpeg | ln -s ffmpeg-4.1.3-amd64-static/ ffmpeg | Création d'un lien symbolique |
| root | /opt/ffmpeg | chown -R pod:nginx /opt/ffmpeg | Droits |
Installation de ffmpegthumbnailer
Utilisé pour l'encodage des vignettes (plus rapide que ffmpeg dans ce cas là).
| Compte | Répertoire (si besoin) | Commande | Commentaires |
|---|---|---|---|
| root | yum -y install epel-release | ||
| root | rpm --import http://li.nux.ro/download/nux/RPM-GPG-KEY-nux.ro | Key | |
| root | rpm -Uvh http://li.nux.ro/download/nux/dextop/el7/x86_64/nux-dextop-release-0-5.el7.nux.noarch.rpm | Prise en compte du rpm | |
| root | yum repolist | Gestion du repository | |
| root | yum install --enablerepo=epel ffmpeg ffmpeg-devel | Installation pré-requis | |
| root | yum install --enablerepo=epel ffmpegthumbnailer | Installation ffmpegthumbnailer |
Installation de RabbitMQ
Utilisé pour l'encodage déporté.
| Compte | Répertoire (si besoin) | Commande | Commentaires |
|---|---|---|---|
| root | /tmp | wget https://github.com/rabbitmq/erlang-rpm/releases/download/v21.2.3/erlang-21.2.3-1.el7.centos.x86_64.rpm | Téléchargement d'Erlang |
| root | yum install erlang-21.2.3-1.el7.centos.x86_64.rpm | Installation d'Erlang | |
| root | wget https://github.com/rabbitmq/rabbitmq-server/releases/download/v3.7.10/rabbitmq-server-3.7.10-1.el7.noarch.rpm | Téléchargement de RabbitMQ | |
| root | rpm --import https://www.rabbitmq.com/rabbitmq-release-signing-key.asc | Key | |
| root | yum install rabbitmq-server-3.7.10-1.el7.noarch.rpm | Installation de RabbitMQ | |
| root | systemctl enable rabbitmq-server | Activation du service | |
| root | systemctl start rabbitmq-server | Démarrage du service | |
| root | rabbitmq-plugins enable rabbitmq_management | Activation des plugins RabbitMQ (utile pour l'interface Web) | |
| root | rabbitmqctl add_user xxxx yyyy | Création de l'utilisateur pour RabbitMQ ( | |
| root | rabbitmqctl set_user_tags xxxx administrator | Droits administrateur de ce compte | |
| root | rabbitmqctl set_permissions -p / xxxx ".*" ".*" ".*" | Permissions |
![]() Accès nécessaire à http://172.23.41.174:15672
Accès nécessaire à http://172.23.41.174:15672
Installation de Celery avec Celeryd
Utilisé pour un serveur d'encodage.
| Compte | Répertoire (si besoin) | Commande | Commentaires |
|---|---|---|---|
| root | /etc/init.d | wget https://raw.githubusercontent.com/celery/celery/4.2/extra/generic-init.d/celeryd | Fichier du service |
| root | /etc/init.d | chmod 755 /etc/init.d/celeryd | Droits |
| root | emacs /etc/default/celeryd | Création du fichier de configuration CELERYD_NODES="worker1" # Nom du/des worker(s) DJANGO_SETTINGS_MODULE="pod.settings" # settings de votre Pod CELERY_BIN="/data/www/pod/.virtualenvs/django_pod/bin/celery" # répertoire source de celery CELERY_APP="pod.main" # application où se situe celery CELERYD_CHDIR="/data/www/pod/django_projects/podv2" # répertoire du projet Pod (où se trouve manage.py) CELERYD_OPTS="--time-limit=86400 --concurrency=1 --maxtasksperchild=1" # options à appliquer en plus sur le comportement du/des worker(s) CELERYD_LOG_FILE="/var/log/celery/%N.log" # fichier log CELERYD_PID_FILE="/var/run/celery/%N.pid" # fichier pid CELERYD_USER="pod" # utilisateur système utilisant celery CELERYD_GROUP="nginx" # groupe système utilisant celery CELERY_CREATE_DIRS=1 # si celery dispose du droit de création de dossiers CELERYD_LOG_LEVEL="INFO" # niveau d'information qui seront inscrit dans les logs | |
| root | systemctl enable celeryd | Activation du service | |
| root | systemctl start celeryd | Démarrage du service | |
| root | emacs /etc/logrotate.d/celery | Logrotate pour Celery /var/log/celery/*.log {
missingok
notifempty
compress
delaycompress
copytruncate
daily
dateext
rotate 7
size 10M
}
|
Installation de Elasticsearch
Utilisé pour le serveur Elasticsearch.
| Compte | Répertoire (si besoin) | Commande | Commentaires |
|---|---|---|---|
| root | rpm --import https://artifacts.elastic.co/GPG-KEY-elasticsearch | Key | |
| root | emacs /etc/yum.repos.d/elasticsearch.repo | Définition du repository [elasticsearch-6.x] name=Elasticsearch repository for 6.x packages baseurl=https://artifacts.elastic.co/packages/6.x/yum gpgcheck=1 gpgkey=https://artifacts.elastic.co/GPG-KEY-elasticsearch enabled=1 autorefresh=1 type=rpm-md | |
| root | yum install elasticsearch | Installation via yum | |
| root | systemctl enable elasticsearch | Activation du service | |
| root | mkdir /data/elasticsearch | Répertoire de base ES | |
| root | mkdir /data/elasticsearch/data | Répertoire des data ES | |
| root | mkdir /data/elasticsearch/logs | Répertoire des logs ES | |
| root | chown elasticsearch:elasticsearch /data/elasticsearch/ -R | Droits | |
| root | chown elasticsearch:elasticsearch /usr/share/elasticsearch/ -R | Droits | |
| root | chown elasticsearch:elasticsearch /etc/elasticsearch/ -R | Droits | |
| root | emacs /etc/elasticsearch/elasticsearch.yml | Configuration ES cluster.name: pod node.name: node-1 path.data: /data/elasticsearch/data path.logs: /data/elasticsearch/logs network.host: xx.xx.xx.xx discovery.zen.ping.unicast.hosts: ["xx.xx.xx.xx"] | |
| root | systemctl start elasticsearch | Démarrage du service | |
| root | curl -XGET http://xx.xx.xx.xx:9200/_cat/nodes | Vérification | |
| root | /usr/share/elasticsearch/ | bin/elasticsearch-plugin install analysis-icu | Installation du plugin ICU |
| root | systemctl restart elasticsearch | Redémarrage ES |
Installation du module H5PP
A ne faire qu'une seule fois, pour Pod.
| Compte | Répertoire (si besoin) | Commande | Commentaires |
|---|---|---|---|
| pod | /home/pod | source .bashrc | |
| pod | /data/www/pod/django_projects | workon django_pod | Choix de l'environnement |
| pod | /data/www/pod/django_projects | git clone https://github.com/EsupPortail/H5PP.git | Récupération des sources |
| pod | /data/www/pod/django_projects/H5PP | git checkout --track origin/dev | |
| pod | /data/www/pod/django_projects/H5PP | python setup.py sdist | Création du package |
| pod | /data/www/pod/django_projects/podv2 | pip3 install ../H5PP/dist/H5PP-0.1.9.tar.gz | Installation |
| pod | cp /data/www/pod/.virtualenvs/django_pod/lib/python3.6/site-packages/h5pp/static/h5p /data/www/pod/django_projects/podv2/pod/static/h5p -R | Copie des fichiers H5P |
Configuration de Pod
La configuration de Pod est à faire à ce moment là.
Pour cela :
- récupérer les fichiers du répertoire
/data/www/pod/django_projects/podv2/pod/custom, - récupérer les fichiers du répertoire
/data/www/pod/django_projects/podv2/pod/static/custom, - configurer l'ensemble des éléments (cf. documentation).
Installations annexes
A ne faire qu'une seule fois, pour Pod.
| Compte | Répertoire (si besoin) | Commande | Commentaires |
|---|---|---|---|
| pod | /home/pod | source .bashrc | |
| pod | /data/www/pod/django_projects/podv2 | workon django_pod | Choix de l'environnement |
| pod | /data/www/pod/django_projects/podv2 | pip3 install "mysqlclient==1.3.14" | Installation de la librairie pour la base de données (en cas d'erreur, c'est qu'un yum install mariadb-devel n'a pas été fait) |
| pod | /data/www/pod/django_projects/podv2 | python3.6 manage.py create_pod_index | Création de l'index ES (une erreur de suppression est normale, la 1° fois) |
| pod | /data/www/pod/django_projects/podv2 | sh create_data_base.sh | Création de la base de données |
| pod | /data/www/pod/django_projects/podv2 | python3.6 manage.py createsuperuser | Création du super user |
| pod | /data/www/pod/django_projects/podv2 | python3.6 manage.py collectstatic | Gestion des fichiers static |
| root | chmod 755 /data/www/pod/ | Droits (sinon cela peut provoquer une erreur "ImportError: No module named site") | |
| root | chown -R pod:nginx /data/www/pod/media/ | Droit en lecture et en écriture à l'utilisateur web (nginx) | |
| root | chown -R pod:nginx /data/www/pod/.virtualenvs/ | ||
| root | chown -R pod:nginx /data/www/pod/django_projects/ | ||
| root | chmod 755 /data/www/pod/media -R | ||
| root | chmod -R o-rx /data/www/pod/django_projects/podv2/ | Sécurisation |
Serveurs Web 1 et 2
Il s'agit des 2 serveurs Web, mutualisés, basés sur Nginx.
Prérequis
| Compte | Répertoire (si besoin) | Commande | Commentaires |
|---|---|---|---|
| root | yum install emacs | Installation de l'éditeur emacs | |
| root | yum install epel-release | ||
| root | yum install mariadb-devel | Installation du client MySQL/MariaDB |
Installation de Podv2
| Compte | Répertoire (si besoin) | Commande | Commentaires |
|---|---|---|---|
| root | yum install -y https://centos7.iuscommunity.org/ius-release.rpm | Installation : ius-release.noarch 0:1.0-15.ius.centos7 | |
| root | yum update | Mises à jour | |
| root | yum install -y python36u python36u-libs python36u-devel python36u-pip | Installation python 3.6 | |
| root | python3.6 -V | Vérification de la version de Python | |
| root | python3.6 -m pip -V | Vérification de la version de pip | |
| root | python3.6 -m pip install --upgrade pip | Pour mettre à jour pip3 et utiliser directement pip3 | |
| root | pip3 install requests | Installation du package requests | |
| root | pip3 install request | Installation du package request (utile pour la reprise de l'existant) | |
| root | pip3 install wget | Installation du package wget (utile pour la reprise de l'existant) | |
| root | pip3 -V | Pour vérifier la version | |
| root | /data/www/pod/ | pip3 install virtualenvwrapper | Installation environnement virtuel |
| pod | /data/appwww/pod (idem /data/www/pod/, lien ) | emacs .bashrc | Configuration pour l'environnement virtuel de Pod v2 et l'utilisation d'emacs pour sudo
|
| pod | source .bashrc | Prise en compte des modifications |
Installation Nginx & uWSGI
| Compte | Répertoire (si besoin) | Commande | Commentaires |
|---|---|---|---|
| root | yum install --enablerepo=epel nginx | ||
| root | emacs /etc/nginx/nginx.conf |
| |
| root | systemctl enable nginx | Activation du service | |
| root | systemctl start nginx | Démarrage du serveur | |
| pod | /data/www/pod/django_projects/podv2/ | emacs pod/custom/pod_nginx.conf | Configuration Nginx & Pod. # the upstream component nginx needs to connect to
upstream podupstream {
server unix:///var/run/podv2/podv2.sock max_fails=2 fail_timeout=3s;
}
# configuration of the server
server {
# the port your site will be served on
listen 80;
# the domain name it will serve for
server_name video.umontpellier.fr;
charset utf-8;
# max upload size
client_max_body_size 4G;
# Allow to download large files
uwsgi_max_temp_file_size 0;
# Django media
location /media {
alias /data/www/pod/media;
}
location /static {
alias /data/www/pod/django_projects/podv2/pod/static;
}
# Finally, send all non-media requests to the Django server.
location / {
uwsgi_pass podupstream;
# Si besoin, timeout uWsgi à 10min
uwsgi_read_timeout 600;
include /data/www/pod/django_projects/podv2/uwsgi_params;
}
}
|
| root | /data/www/pod/django_projects/podv2/ | ln -s /data/www/pod/django_projects/podv2/pod/custom/pod_nginx.conf /etc/nginx/conf.d/pod_nginx.conf | Création du lien symbolique dans Nginx pour Pod |
| root | systemctl restart nginx | Redémarrage nginx | |
| root | pip3 install uwsgi | Installation uWSGI | |
| pod | emacs /data/www/pod/django_projects/podv2/pod/custom/pod_uwsgi.ini | Configuration uWSGI # pod_uwsgi.ini file [uwsgi] # Django-related settings # the base directory (full path) chdir = /data/www/pod/django_projects/podv2 # Django's wsgi file module = pod.wsgi # the virtualenv (full path) home = /data/www/pod/.virtualenvs/django_pod # process-related settings # master master = true # maximum number of worker processes processes = 10 # the socket (use the full path to be safe) socket = /var/run/podv2/podv2.sock chown-socket = pod:nginx chmod-socket = 660 # clear environment on exit vacuum = true # daemonize = /var/log/podv2/uwsgi-pod.log # die-on-term = true # limit-as = 5120 max-requests = 5000 #harakiri = 30 #ignore-sigpipe=true #ignore-write-errors=true #disable-write-exception=true | |
| root | mkdir /var/run/podv2 | Création répertoire de run pour uWSGI | |
| root | chown pod:nginx /var/run/podv2/ | Droits de ce répertoire | |
| root | mkdir /var/log/podv2 | Création répertoire de run pour uWSGI | |
| root | chown pod:nginx /var/log/podv2/ | Droits de ce répertoire |
Mise en place du service
| Compte | Répertoire (si besoin) | Commande | Commentaires |
|---|---|---|---|
| root | emacs /etc/systemd/system/uwsgi-pod.service | Configuration du service # [Unit] Description=Pod uWSGI app After=network.target remote-fs.target nss-lookup.target [Service] ExecStartPre=/usr/bin/bash -c 'export WORKON_HOME=/data/www/pod/.virtualenvs; export VIRTUALENVWRAPPER_PYTHON=/usr/bin/python3.6; cd /data/www/pod/django_projects/podv2; source /usr/bin/virtualenvwrapper.sh; workon django_pod;' ExecStart=/usr/bin/bash -c '/usr/bin/uwsgi --ini /data/www/pod/django_projects/podv2/pod/custom/pod_uwsgi.ini --enable-threads --uid pod --gid nginx --pidfile /var/run/podv2/pod.pid' ExecStop=/usr/bin/uwsgi --stop /var/run/podv2/pod.pid User=pod Group=nginx Restart=on-failure Type=notify TimeoutStopSec=15 KillSignal=SIGQUIT RemainAfterExit=yes StandardError=syslog NotifyAccess=all StartLimitBurst=0 [Install] WantedBy=multi-user.target limit-as=512 | |
| root | systemctl daemon-reload | Prise en compte des modifications | |
| root | systemctl enable uwsgi-pod.service | Activation du service | |
| root | systemctl start uwsgi-pod.service | Démarrage du service |
Serveurs d'encodage
Il s'agit du serveur d'encodage principal et du serveur d'encodage secondaire (à l'UM, serveur qui sert également au streaming live via Wowza).
Prérequis
| Compte | Répertoire (si besoin) | Commande | Commentaires |
|---|---|---|---|
| root | yum install emacs | Installation de l'éditeur emacs | |
| root | yum install epel-release | ||
| root | yum install mariadb-devel | Installation du client MySQL/MariaDB |
Installation de Podv2
| Compte | Répertoire (si besoin) | Commande | Commentaires |
|---|---|---|---|
| root | yum install -y https://centos7.iuscommunity.org/ius-release.rpm | Installation : ius-release.noarch 0:1.0-15.ius.centos7 | |
| root | yum update | Mises à jour | |
| root | yum install -y python36u python36u-libs python36u-devel python36u-pip | Installation python 3.6 | |
| root | python3.6 -V | Vérification de la version de Python | |
| root | python3.6 -m pip -V | Vérification de la version de pip | |
| root | python3.6 -m pip install --upgrade pip | Pour mettre à jour pip3 et utiliser directement pip3 | |
| root | pip3 install requests | Installation du package requests | |
| root | pip3 install request | Installation du package request (utile pour la reprise de l'existant) | |
| root | pip3 install wget | Installation du package wget (utile pour la reprise de l'existant) | |
| root | pip3 -V | Pour vérifier la version | |
| root | /data/www/pod/ | pip3 install virtualenvwrapper | Installation environnement virtuel |
| pod | /home/pod/ | emacs .bashrc | Configuration pour l'environnement virtuel de Pod v2 et l'utilisation d'emacs pour sudo
|
| pod | /home/pod/ | source .bashrc | Prise en compte des modifications |
| pod | /home/pod/ | ln -s /data/www/pod/django_projects django_projects | Création lien symbolique dans le home directory |
Installation de ImageMagick
Utilisé pour la génération des overviews.
| Compte | Répertoire (si besoin) | Commande | Commentaires |
|---|---|---|---|
| root | yum install ImageMagick ImageMagick-devel |
Installation de ffmpeg
Utilisé pour l'encodage des vidéos.
| Compte | Répertoire (si besoin) | Commande | Commentaires |
|---|---|---|---|
| root | /opt | mkdir ffmpeg | Répertoire ffmpeg |
| root | /opt/ffmpeg | wget https://johnvansickle.com/ffmpeg/releases/ffmpeg-release-amd64-static.tar.xz | Téléchargement |
| root | /opt/ffmpeg | tar -Jxvf ffmpeg-release-amd64-static.tar.xz | Dézip |
| root | /opt/ffmpeg | ln -s ffmpeg-4.1.3-amd64-static/ ffmpeg | Création d'un lien symbolique |
| root | /opt/ffmpeg | chown -R pod:nginx /opt/ffmpeg | Droits |
Installation de ffmpegthumbnailer
Utilisé pour l'encodage des vignettes (plus rapide que ffmpeg dans ce cas là).
| Compte | Répertoire (si besoin) | Commande | Commentaires |
|---|---|---|---|
| root | yum -y install epel-release | ||
| root | rpm --import http://li.nux.ro/download/nux/RPM-GPG-KEY-nux.ro | Key | |
| root | rpm -Uvh http://li.nux.ro/download/nux/dextop/el7/x86_64/nux-dextop-release-0-5.el7.nux.noarch.rpm | Prise en compte du rpm | |
| root | yum repolist | Gestion du repository | |
| root | yum install --enablerepo=epel ffmpeg ffmpeg-devel | Installation pré-requis | |
| root | yum install --enablerepo=epel ffmpegthumbnailer | Installation ffmpegthumbnailer |
Installation de Celery avec Celeryd
Utilisé pour un serveur d'encodage.
| Compte | Répertoire (si besoin) | Commande | Commentaires |
|---|---|---|---|
| root | /etc/init.d | wget https://raw.githubusercontent.com/celery/celery/4.2/extra/generic-init.d/celeryd | Fichier du service |
| root | /etc/init.d | chmod 755 /etc/init.d/celeryd | Droits |
| root | emacs /etc/default/celeryd | Création du fichier de configuration
| |
| root | systemctl enable celeryd | Activation du service | |
| root | systemctl start celeryd | Démarrage du service | |
| root | emacs /etc/logrotate.d/celery | Logrotate pour Celery
|